Getting Started on Azure DevOps
Azure DevOps Documentation with Simple React App
What is Azure DevOps?
Azure DevOps is a DevOps platform from Microsoft.
It is a Software as a Service (SaaS) platform used to implement DevOps processes for software development and deployment.
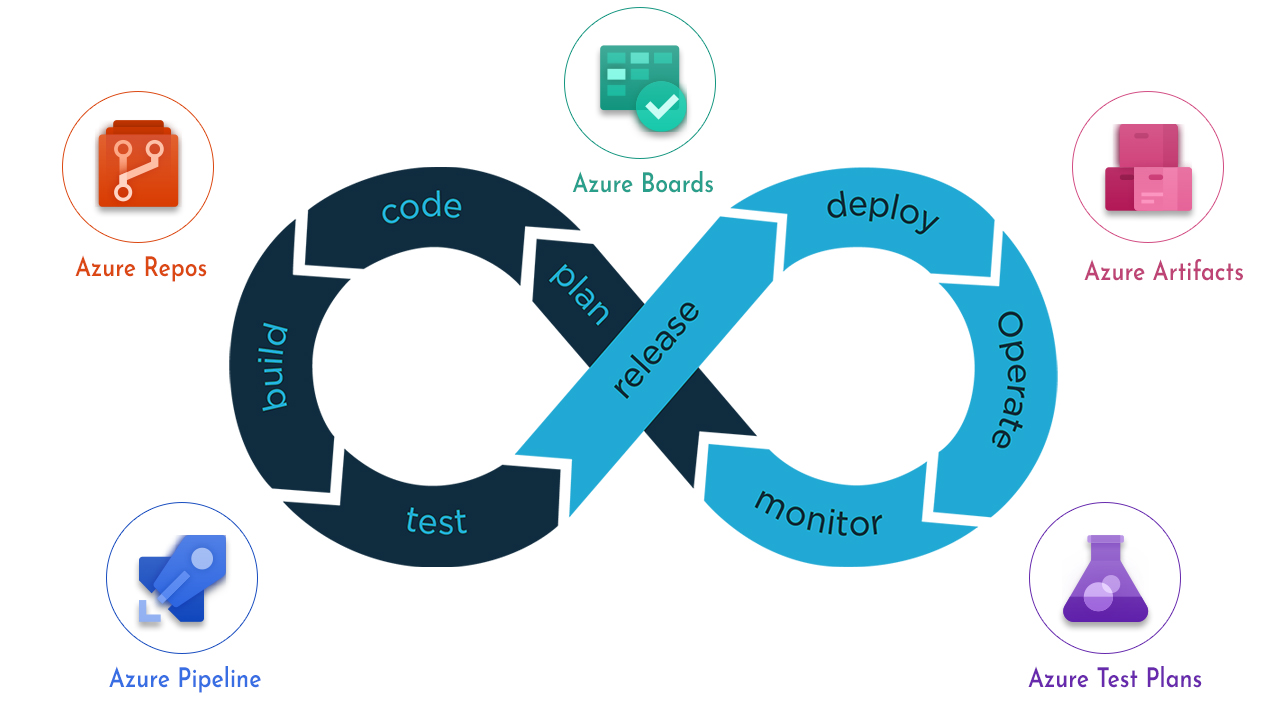
Azure DevOps helps teams manage the full software delivery lifecycle:
Plan → Code → Build → Test → Package → Release → Deploy
Azure DevOps is used for:
- Planning work
- Managing source code
- Running CI/CD pipelines
- Testing applications
- Storing packages
- Deploying applications
Azure DevOps is similar to:
- GitHub
- GitLab
- Bitbucket
- Jenkins
- CircleCI
The main difference is that Azure DevOps provides multiple DevOps services inside one Microsoft platform.
What is a DevOps Platform?
A DevOps platform is a combination of:
- Concepts
- Tools
- Practices
- Automation
- Collaboration workflows
The goal of a DevOps platform is to make software development and application release:
- Faster
- Automated
- Repeatable
- High quality
- Easier to manage
A DevOps platform helps answer:
- What should we build?
- Where is the code stored?
- How do we test the code?
- How do we package the application?
- Where do we deploy it?
- How do we track issues?
- How do we manage releases?
5 Core Azure DevOps Services
Azure DevOps has 5 main services:
- Azure Boards
- Azure Repos
- Azure Pipelines
- Azure Test Plans
- Azure Artifacts
1. Azure Boards
Azure Boards is used for planning and tracking work.
Planning is usually the first step before development.
Azure Boards helps define:
- What needs to be developed
- Why it needs to be developed
- Who will work on it
- What stage the work is currently in
- Which bugs or features are pending
Common work items:
- Epic
- Feature
- User Story
- Task
- Bug
Example:
Feature:
Create React Landing Page

Tasks:
- Create React project
- Create homepage component
- Add navigation
- Add responsive layout
- Add build pipeline
- Deploy to development environment
2. Azure Repos
Azure Repos is used for source control management.
It allows you to host your code in a private Git repository.
Azure Repos is similar to:
- GitHub
- GitLab
- Bitbucket
Azure Repos is based on Git.
It is not only for storing code. It is also used for collaboration.
Common Azure Repos features:
- Git repository hosting
- Branching
- Pull requests
- Code review
- Branch policies
- Merge protection
What are Git Workflows?
A Git workflow is the way a team uses Git when working on code.
It defines how branches are created, reviewed, merged, and released.
Common Git workflows:
- Centralized workflow
- Feature branching
- Trunk-based development
- GitFlow
Example feature branch workflow:
main
  └── feature/react-homepage
        └── Pull Request
              └── Code Review
                    └── Merge to main
3. Azure Pipelines
Azure Pipelines is used for CI/CD automation.
It can:
- Install dependencies
- Run tests
- Build the application
- Package the application
- Build Docker images
- Push Docker images to a registry
- Deploy the application to environments
Azure Pipelines can be written using YAML.
The common YAML file name is:
azure-pipelines.yml
This file should be placed in the root of the repository.
Example:
demo-devops/
├── azure-pipelines.yml
├── package.json
├── vite.config.js
├── index.html
├── src/
└── public/
CI/CD
What is CI?
CI means Continuous Integration.
CI is the process of automatically testing and building code whenever developers push changes.
For a React app, CI usually means:
npm install → npm run build → publish dist folder
CI answers:
- Is the code working?
- Can the application build successfully?
- Do the tests pass?
- Can we create a deployable output?
What is CD?
CD means Continuous Delivery or Continuous Deployment.
CD is the process of automatically delivering or deploying the tested application to an environment.
For a React app, CD usually means deploying either:
dist/
or:
Docker image
Deployment targets can be:
- Azure Static Web Apps
- Azure App Service
- Azure Container Apps
- Kubernetes
- Nginx server
- Netlify
- Vercel
Azure Pipelines Structure
Azure Pipelines uses this structure:
Pipeline
  └── Stage
        └── Job
              └── Step
Pipeline
A pipeline is the full automation workflow.
Example:
Install Dependencies → Build React App → Publish Artifact → Deploy
Stage
A stage is a logical boundary in the pipeline.
Common stages:
- Build
- Test
- DeployDev
- DeployProd
Stages usually run one after another by default.
Example:
Build Stage → Deploy Stage
Job
A job is a group of steps that run on an agent.
Each job runs on an agent machine.
Jobs can run in parallel.
Example use cases for multiple jobs:
- Test on Linux
- Test on Windows
- Build frontend
- Build backend
- Deploy app
- Run security scan
Agent
An agent is the computing machine that runs the pipeline job.
It has Azure Pipelines agent software installed.
Example hosted agent:
pool:
  vmImage: 'ubuntu-22.04'
The vmImage defines the operating system used by the pipeline job.
Common examples:
ubuntu-latest
ubuntu-22.04
windows-latest
macOS-latest
Step
A step is the smallest building block of a pipeline.
Each step executes one action.
A step can be:
- A script
- A task
Example script step:
- script: npm install
  displayName: Install dependencies
Task
A task is a pre-created reusable pipeline action.
Instead of writing the full command manually, you can use a task with inputs.
Example:
- task: NodeTool@0
  displayName: Use Node.js
  inputs:
    versionSpec: '22.x'
Artifact
An artifact is a deployable output produced by a pipeline.
For a React/Vite app, the artifact is usually:
dist/
The dist/ folder contains the optimized production build.
It usually includes:
- HTML
- CSS
- JavaScript
- Images
- Static assets
For React:
Source Code → npm run build → dist folder
The dist/ folder can be deployed to:
- Azure Static Web Apps
- Azure App Service
- Nginx
- Docker container
- Netlify
- Vercel
Azure Artifacts
Azure Artifacts is used to store and share packages.
Examples:
- npm packages
- NuGet packages
- Maven packages
- Python packages
- Universal packages
Important distinction:
Azure Artifacts is for packages.
Container Registry is for Docker images.
For Docker-based deployment, Docker images should usually be pushed to a container registry such as:
- Azure Container Registry
- Docker Hub
- GitHub Container Registry
- GitLab Container Registry
Example:
Azure Pipelines → Build Docker Image → Push to Container Registry → Deploy
For a simple React app, you do not need Azure Artifacts at the beginning.
Start with:
Azure Repos → Azure Pipelines → Deployment
File Tree for the React DevOps Demo
After creating the React app and DevOps files, your project should look like this:
demo-devops/
├── azure-pipelines.yml
├── Dockerfile
├── .dockerignore
├── package.json
├── package-lock.json
├── vite.config.js
├── index.html
├── public/
│   └── vite.svg
├── src/
│   ├── App.jsx
│   ├── App.css
│   ├── main.jsx
│   └── index.css
└── dist/
    └── generated after npm run build
Important:
azure-pipelines.yml
Place this in the root of the repo.
Dockerfile
Place this in the root of the repo.
.dockerignore
Place this in the root of the repo.
dist/
Do not create this manually. It is generated by:
npm run build
Step-by-Step: Azure DevOps with a Simple React App
Your Azure Repos repository:
https://sherwintajan143@dev.azure.com/sherwintajan143/demo-devops/_git/demo-devops
Step 1: Clone the Repository
Run:
git clone https://sherwintajan143@dev.azure.com/sherwintajan143/demo-devops/_git/demo-devops
Go inside the repo:
cd demo-devops
Check the current branch:
git branch
Check the remote:
git remote -v
Expected remote should look similar to:
origin  https://sherwintajan143@dev.azure.com/sherwintajan143/demo-devops/_git/demo-devops (fetch)
origin  https://sherwintajan143@dev.azure.com/sherwintajan143/demo-devops/_git/demo-devops (push)
Step 2: Create a Simple React App
Run this inside the repo root:
npm create vite@latest . -- --template react
Install dependencies:
npm install
Run the app locally:
npm run dev
Vite usually runs on:
http://localhost:5173
Step 3: Test the React Build Locally
Before creating the pipeline, make sure the app builds successfully.
npm run build
This creates a production build inside:
dist/
Create the Azure Pipeline File
Step 4: Create azure-pipelines.yml
In the root of the repo, create:
azure-pipelines.yml
Your repo should look like this:
demo-devops/
├── azure-pipelines.yml
├── package.json
├── vite.config.js
├── index.html
├── src/
└── public/
Option 1: Basic CI Pipeline
Use this first.
This pipeline only:
- Installs Node.js
- Installs dependencies
- Builds the React app
- Publishes
distas artifact
Put this inside:
azure-pipelines.yml
trigger:
- main

pool:
  vmImage: 'ubuntu-22.04'

steps:
- task: NodeTool@0
  displayName: Use Node.js
  inputs:
    versionSpec: '22.x'

- script: npm install
  displayName: Install dependencies

- script: npm run build
  displayName: Build React app

- publish: dist
  displayName: Publish React build artifact
  artifact: react-dist
If your branch is master, change:
trigger:
- main
to:
trigger:
- master
Pipeline flow:
Push code
  ↓
Install Node.js
  ↓
npm install
  ↓
npm run build
  ↓
Publish dist artifact
Use this first before Docker or deployment.
Step 5: Commit and Push the React App and Pipeline
Check your files:
git status
Stage the files:
git add .
Commit:
git commit -m "Add React app and Azure Pipeline"
Push:
git push
Step 6: Create the Pipeline in Azure DevOps
Go to Azure DevOps.
Open your project:
demo-devops
Go to:
Pipelines → New Pipeline
Choose:
Azure Repos Git
Select your repository:
demo-devops
Choose:
Existing Azure Pipelines YAML file
Select:
/azure-pipelines.yml
Click:
Run
If the pipeline succeeds, your CI is working.
Add Docker for React
Use Docker if you want to package the React app as a container.
A React app itself is static after build.
Docker is usually used here to serve the React dist/ folder using Nginx.
Step 7: Create Dockerfile
In the root of the repo, create:
Dockerfile
Your repo should look like this:
demo-devops/
├── azure-pipelines.yml
├── Dockerfile
├── package.json
├── package-lock.json
├── vite.config.js
├── index.html
├── src/
└── public/
Add this inside Dockerfile:
FROM node:22-alpine AS build
WORKDIR /app

COPY package*.json ./
RUN npm install

COPY . .
RUN npm run build

FROM nginx:alpine
COPY --from=build /app/dist /usr/share/nginx/html

EXPOSE 80

CMD ["nginx", "-g", "daemon off;"]
Explanation:
First stage:
- Uses Node.js to install dependencies and build the React app.
Second stage:
- Uses Nginx to serve the static files from
dist/.
Step 8: Create .dockerignore
In the root of the repo, create:
.dockerignore
Your repo should look like this:
demo-devops/
├── azure-pipelines.yml
├── Dockerfile
├── .dockerignore
├── package.json
├── package-lock.json
├── vite.config.js
├── index.html
├── src/
└── public/
Add this inside .dockerignore:
node_modules
dist
.git
.gitignore
azure-pipelines.yml
README.md
.env
.env.*
Why:
node_modulesshould not be copied into the image.distis generated inside Docker..gitis not needed inside the image..envfiles should not be copied into the image.
Step 9: Test Docker Locally
Build the image:
docker build -t demo-devops-react:local .
Run the container:
docker run --rm -p 8080:80 demo-devops-react:local
Open:
http://localhost:8080
If the app loads, the Dockerfile works.
Option 2: CI Pipeline with Docker Build Only
Use this when you want Azure DevOps to build the Docker image but not push it yet.
Put this inside:
azure-pipelines.yml
trigger:
- main

pool:
  vmImage: 'ubuntu-22.04'

steps:
- task: NodeTool@0
  displayName: Use Node.js
  inputs:
    versionSpec: '22.x'

- script: npm install
  displayName: Install dependencies

- script: npm run build
  displayName: Build React app

- task: Docker@2
  displayName: Build Docker image
  inputs:
    command: 'build'
    Dockerfile: 'Dockerfile'
    buildContext: '.'
    tags: |
      $(Build.BuildId)
Pipeline flow:
Push code
  ↓
Install Node.js
  ↓
npm install
  ↓
npm run build
  ↓
docker build
Important:
This only confirms that Docker build works in Azure Pipelines.
It does not push the image to Docker Hub or Azure Container Registry.
Docker Registry Service Connection
To push Docker images from Azure DevOps, you need a Docker Registry service connection.
This is required for:
- Docker Hub
- Azure Container Registry
- GitHub Container Registry
- Any private container registry
Where to Find Docker Service Connections
In Azure DevOps:
Azure DevOps Project
  → Project Settings
  → Service connections
  → New service connection
  → Docker Registry
Then choose your registry type.
Common options:
- Docker Hub
- Azure Container Registry
- Others
Option A: Docker Hub Service Connection
Use this if you want to push images to Docker Hub.
Azure DevOps path:
Project Settings
  → Service connections
  → New service connection
  → Docker Registry
  → Docker Hub
Fill in:
Docker ID: your Docker Hub username
Docker Password: Docker Hub access token or password
Service connection name: dockerhub-demo-devops
Recommended service connection name:
dockerhub-demo-devops
Then in the pipeline, use:
dockerRegistryServiceConnection: 'dockerhub-demo-devops'
Option B: Azure Container Registry Service Connection
Use this if you want to push images to Azure Container Registry.
Azure DevOps path:
Project Settings
  → Service connections
  → New service connection
  → Docker Registry
  → Azure Container Registry
Select:
Authentication Type: Service Principal
Azure subscription: Your subscription
Azure container registry: Your ACR name
Service connection name: acr-demo-devops
Recommended service connection name:
acr-demo-devops
Then in the pipeline, use:
dockerRegistryServiceConnection: 'acr-demo-devops'
Option 3: CI Pipeline with Docker Build and Push
Use this when your Docker service connection already exists.
Put this inside:
azure-pipelines.yml
trigger:
- main

pool:
  vmImage: 'ubuntu-22.04'

variables:
  imageRepository: 'demo-devops-react'
  dockerRegistryServiceConnection: 'dockerhub-demo-devops'
  tag: '$(Build.BuildId)'

steps:
- task: Docker@2
  displayName: Build and push Docker image
  inputs:
    command: 'buildAndPush'
    repository: '$(imageRepository)'
    dockerfile: 'Dockerfile'
    buildContext: '.'
    containerRegistry: '$(dockerRegistryServiceConnection)'
    tags: |
      $(tag)
      latest
If using Azure Container Registry, change:
dockerRegistryServiceConnection: 'dockerhub-demo-devops'
to:
dockerRegistryServiceConnection: 'acr-demo-devops'
Pipeline flow:
Push code
  ↓
Build Docker image
  ↓
Tag Docker image
  ↓
Push Docker image to registry
Important:
This version assumes your Dockerfile works.
Test Docker locally first before using this pipeline.
Deployment Options for a React App
For a simple React app, you have two common deployment approaches.
Option 1
Deploy the dist/ folder directly.
Option 2
Deploy the Docker image.
Deployment Option 1: Azure Static Web Apps
Use this if your React app is just a frontend static site.
This is the simplest Azure deployment target for React.
Best for:
- Vite React app
- Static frontend
- No custom server
- No Docker required
Deployment output:
dist/
Create Azure Static Web App
In Azure Portal:
Azure Portal
  → Create a resource
  → Static Web App
Fill in:
Subscription: your subscription
Resource Group: create or select one
Name: demo-devops-react
Plan type: Free or Standard
Region: choose nearest region
Deployment source: Other
After creating it, get the deployment token.
Path:
Azure Static Web App
  → Manage deployment token
  → Copy token
Add Deployment Token to Azure DevOps
In Azure DevOps:
Pipelines
  → Library
  → Variable groups
  → New variable group
Create:
Variable group name: demo-devops-secrets
Add variable:
Name: AZURE_STATIC_WEB_APPS_API_TOKEN
Value: paste deployment token here
Mark it as secret.
Then save.
Link Variable Group in Pipeline
Use this in azure-pipelines.yml:
variables:
- group: demo-devops-secrets
Full CI/CD Pipeline for Azure Static Web Apps
Put this inside:
azure-pipelines.yml
trigger:
- main

pool:
  vmImage: 'ubuntu-22.04'

variables:
- group: demo-devops-secrets

stages:
- stage: Build
  displayName: Build React App
  jobs:
  - job: BuildReact
    displayName: Build React Job
    steps:
    - task: NodeTool@0
      displayName: Use Node.js
      inputs:
        versionSpec: '22.x'

    - script: npm install
      displayName: Install dependencies

    - script: npm run build
      displayName: Build React app

    - publish: dist
      displayName: Publish React artifact
      artifact: react-dist

- stage: Deploy
  displayName: Deploy to Azure Static Web Apps
  dependsOn: Build
  condition: succeeded()
  jobs:
  - deployment: DeployStaticWebApp
    displayName: Deploy Static Web App
    environment: 'development'
    strategy:
      runOnce:
        deploy:
          steps:
          - checkout: self

          - task: AzureStaticWebApp@0
            displayName: Deploy React app to Azure Static Web Apps
            inputs:
              app_location: '/'
              output_location: 'dist'
              azure_static_web_apps_api_token: '$(AZURE_STATIC_WEB_APPS_API_TOKEN)'
Important:
app_location: '/'
This means the React app is in the root of the repo.
output_location: 'dist'
This means the React production build is in the dist folder.
Use this deployment option first if you are only deploying a simple React frontend.
Deployment Option 2: Azure Container Apps with Docker
Use this if you want to deploy the React app as a Docker container.
Best for:
- Learning Docker-based deployment
- Containerized frontend
- Azure Container Apps
- Same deployment style as backend services
Deployment output:
Docker image
Flow:
React source code
  ↓
Docker build
  ↓
Push image to Azure Container Registry
  ↓
Deploy image to Azure Container Apps
Required Azure Resources
You need:
- Azure Container Registry
- Azure Container App
- Azure DevOps service connection to ACR
- Azure DevOps service connection to Azure subscription
Step 1: Create Azure Container Registry
In Azure Portal:
Azure Portal
  → Create a resource
  → Container Registry
Fill in:
Registry name: your unique registry name
Resource group: your resource group
Location: nearest region
SKU: Basic
Example registry name:
demodevopsacr
Your image repository will become:
demodevopsacr.azurecr.io/demo-devops-react
Step 2: Create Docker Registry Service Connection for ACR
In Azure DevOps:
Project Settings
  → Service connections
  → New service connection
  → Docker Registry
  → Azure Container Registry
Fill in:
Authentication Type: Service Principal
Azure subscription: your subscription
Azure container registry: demodevopsacr
Service connection name: acr-demo-devops
Save it.
Step 3: Create Azure Resource Manager Service Connection
This is needed for deployment to Azure resources.
In Azure DevOps:
Project Settings
  → Service connections
  → New service connection
  → Azure Resource Manager
Choose:
Service principal automatic
Fill in:
Subscription: your subscription
Resource group: your resource group
Service connection name: azure-demo-devops
Save it.
Step 4: Create Azure Container App
In Azure Portal:
Azure Portal
  → Create a resource
  → Container App
Fill in:
Container app name: demo-devops-react
Resource group: your resource group
Region: nearest region
Container image: use a temporary image first
Ingress: Enabled
Ingress traffic: Accepting traffic from anywhere
Target port: 80
Because the React Docker image uses Nginx, the container listens on port:
80
Step 5: Full CI/CD Pipeline for Azure Container Apps
Put this inside:
azure-pipelines.yml
Replace the values below with your real Azure values:
demodevopsacr.azurecr.io
your-resource-group
demo-devops-react
trigger:
- main

pool:
  vmImage: 'ubuntu-22.04'

variables:
  imageRepository: 'demo-devops-react'
  dockerRegistryServiceConnection: 'acr-demo-devops'
  azureServiceConnection: 'azure-demo-devops'
  containerRegistryLoginServer: 'demodevopsacr.azurecr.io'
  resourceGroup: 'your-resource-group'
  containerAppName: 'demo-devops-react'
  tag: '$(Build.BuildId)'

stages:
- stage: Build
  displayName: Build and Push Docker Image
  jobs:
  - job: BuildDocker
    displayName: Build Docker Job
    steps:
    - task: Docker@2
      displayName: Build and push Docker image
      inputs:
        command: 'buildAndPush'
        repository: '$(imageRepository)'
        dockerfile: 'Dockerfile'
        buildContext: '.'
        containerRegistry: '$(dockerRegistryServiceConnection)'
        tags: |
          $(tag)
          latest

- stage: Deploy
  displayName: Deploy to Azure Container Apps
  dependsOn: Build
  condition: succeeded()
  jobs:
  - deployment: DeployContainerApp
    displayName: Deploy Container App
    environment: 'development'
    strategy:
      runOnce:
        deploy:
          steps:
          - task: AzureCLI@2
            displayName: Update Azure Container App image
            inputs:
              azureSubscription: '$(azureServiceConnection)'
              scriptType: 'bash'
              scriptLocation: 'inlineScript'
              inlineScript: |
                az containerapp update \
                  --name $(containerAppName) \
                  --resource-group $(resourceGroup) \
                  --image $(containerRegistryLoginServer)/$(imageRepository):$(tag)
Pipeline flow:
Push code
  ↓
Build Docker image
  ↓
Push Docker image to ACR
  ↓
Update Azure Container App image
  ↓
Azure Container App creates a new revision
Which Deployment Should You Use First?
For a simple React app, use this order:
- Basic CI pipeline
- Azure Static Web Apps deployment
- Dockerfile
- Docker build pipeline
- Docker push to registry
- Azure Container Apps deployment
Do not start with Docker deployment first unless the goal is specifically to learn containers.
For a beginner React deployment, the best path is:
React + Vite
  ↓
npm run build
  ↓
dist/
  ↓
Azure Static Web Apps
For container learning, use:
React + Vite
  ↓
Dockerfile
  ↓
Docker image
  ↓
Azure Container Registry
  ↓
Azure Container Apps
Recommended Final Project Structure
Use this final structure if you want both static deployment and Docker deployment:
demo-devops/
├── azure-pipelines.yml
├── Dockerfile
├── .dockerignore
├── README.md
├── package.json
├── package-lock.json
├── vite.config.js
├── index.html
├── public/
│   └── vite.svg
├── src/
│   ├── App.jsx
│   ├── App.css
│   ├── main.jsx
│   └── index.css
└── dist/
    └── generated by npm run build
Important:
Do not commit dist/ unless you intentionally want to store build output.
Normally, dist/ is generated by the pipeline.
Add dist/ to .gitignore if it is not already ignored.
Recommended .gitignore
For React/Vite, your .gitignore should include:
node_modules
dist
.env
.env.*
.DS_Store
.vscode
Final Simple Workflow
For your current demo repo, the first goal should be:
Clone repo
  ↓
Create React app
  ↓
Push to Azure Repos
  ↓
Create Azure Pipeline
  ↓
Run npm install
  ↓
Run npm run build
  ↓
Publish dist folder as artifact
After that works, choose deployment:
Simple frontend deployment:
Deploy dist/ to Azure Static Web Apps
Docker deployment:
Build Docker image → Push to ACR → Deploy to Azure Container Apps
Start with CI first.
Then add CD.
Then add Docker only when the simple deployment is already clear.